Shared Contacts for Gmail®
Get your 15-days free trial
Technically, you don’t need to assign the licenses manually. The app itself automatically assign licenses.
Shared Contacts for Gmail® designates one license per account you share the labels with.
Let’s take a look at this scenario. John is the account admin. He bought five (5) licenses. Then, he shares the labels with four of his colleagues: Jake, Alice, Sofie, and Kate.
The app counts this as having five (5) used licenses. License number 1 is of course assigned to John. Consequently, license number 2 is assigned to the first person John shared the contact with, let’s say Jake. License number 3, 4, and 5 goes to Alice, Sofie, and Kate respectively.
Again, the admin or even the end users don’t need to do anything from the “Users & Licenses” tab of the app.
Suppose that John needed to share the label with a new employee, Liam. For this scenario, John then needs to buy an additional license.
Only the account administrator can buy additional licenses. He can do so by clicking on the “Buy Licenses” on the “Users & Licenses” page.
For example, Kate is leaving the company. In this case, John the admin simply needs to unshare the label with Kate. This would automatically free up a license that would be available to the replacement user.
Read: How to Liberate Licenses for Departed Users
In a different scenario, Kate leaves the company and Liam replaces her. In this case, John just needs to “unshare” the contacts to Kate first.
Read: How to Unshare Contacts That You Have Shared With Others
After doing so, license number 5 is left unused until John assigns it to Liam, simply by clicking the “share” icon on the contact list.
First, John, the admin needs to unshare the label with the user who would no longer be part of the group. The procedure is similar to Case No. 2. He is freeing up license number 5.
Next, he has to buy one additional license. That would be license number 6. Now, there are two licenses available. He can now share labels for the new employees.
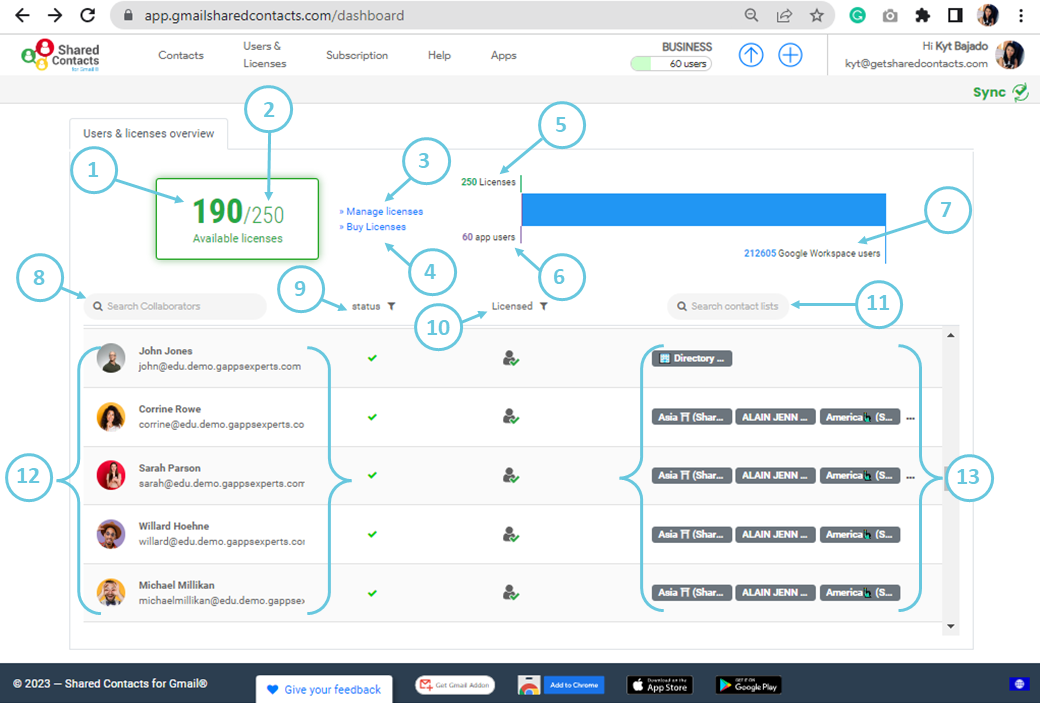
This is the Users & Licenses tab as seen from the Web application.
① “Numerator” → the number of available licenses. Taking this example, it means you can share the contacts to 190 users more.
② “Denominator” → the total number of licenses bought. Buy more licenses if the numerator is
③ “Manage licenses” → This menu brings you to the page where you can see and share or unshare your contacts or contact lists. When you notice that the “numerator” is almost the same as the “denominator”, then it can be the time to free some licenses and you can easily do so by clicking this link.
④ “Buy licenses” → Only account admins can have access to this link. The account admin has the sole authority to add more licenses. If you are not the account administrator and you need to share labels with more users, contact your account admin to do so.
⑤ “X Licenses” → Total number of licenses. Similar to number ②.
⑥ “X app users” → This is the total number of used licenses. In this example, there are 60 different users with varying access to the labels.
⑦ “X Google workspace users” → This is the number of users in the Google Workspace domain.
⑧ “Search collaborators” → Collaborators are the users having a license. You can use this to know all the labels shared to a certain collaborator.
⑨ “Status” → This shows the collaboration status of the user (Normal/Deleted/Suspended/Banned/Revoked/Invitation Pending/Unknown).
⑩ “Licensed” → This shows whether the user has a license assigned or the user needs a license.

⑪ “Search contact lists” → The search bar allows you to find a certain user in the group. You can use this to check all the labels shared with the specific user.
⑫ “Contacts” → All the users having a license.
⑬ “Labels” → List of the shared labels with the user.
Through this page, the admin can easily revoke access to all the labels shared with an account. This is especially useful when an employee leaves the company. Furthermore, the admin can also view this page to review all the labels shared to users.
On the other hand, the admin does not need this page to assign licenses. As mentioned earlier, licenses are automatically assigned. One license is, used by each account that accepts a shared label.